

The stables at Park Royal followed the classic outlines of what I call the “Style B” of GWR stable blocks. This is a sketch. The model itself was built using the GWR drawing that is reproduced in "Great Western Horsepower" by Janet Russell and in Adrian Vaughan's "Pictorial Record of Great Western Architecture".

I used my Silhouette cutter extensively for the build. The GWR drawings were imported into Inkscape, on top of which I then drew up my own drawings for the cutting file. Getting the hang of this was a learning process in itself, and I’m very grateful to Jason and Mike for their excellent RMweb threads on using the Silhouette and Inkscape.

The digital drawings were then used to print the main sections on my Silhouette Portrait cutter. The cutting mat for the Portrait is shorter than the length of the stable block, but I eventually discovered that two mats can be used in extension of each other, with the styrene sheet bridging them, as seen here.

The Silhouette can't cut 20 thou, which is a problem if you’re using embossed sheets, since most of these seem to be of that thickness, including the SE Finecast sheets that I favour. So I used the Cutter to score the rear side of the sheet, and then cut through manually with a scalpel.

The cut sections were then laminated onto further layers to create depth. I ended up with five layers in total. The front of the building was done before I discovered that I could print the full length of the building in one go.

The vents, lintels and sills were also cut on the Silhouette. This is where it started feeling like making your own kit.

I initially struggled a bit to get the windows cut well. The silhouette isn’t really designed for this sort of detail work. The best I could manage was 0.3mm glazing bars. The hit and miss vents aren’t perfect, but once painted I think they came out OK.

The doors were built up like this. They were quite tall and wide, which initially puzzled me until I realized that some rather big beasts had to pass through them!

The windows and doors were fitted as the middle layer in the 5 layer sandwich.

I modelled a couple of the windows in open position, to add signs of life.

The rear wall was easy work. It was very plain on the prototype, as per most GWR stable blocks. I assume to give the horses a bit of peace and quiet (windows were sometimes retro-fitted when the stables were converted to garages).


Once cut, the vinyl strips can easily be pulled off the backing and are not as fragile as paper or card strip, which allows repositioning.

Right, I thought, nearly done! But then came the roof vents…
The roof vents – aka cupolas - turned out to be a whole project in themselves. I needed six, which eventually amounted to some 220 individual pieces. The photos below show how I made them. I hope they are more or less self explanatory:


There followed a discussion in the workbench thread as to whether slate was actually used on the cupolas. Some photos *seem* to show it, but it remains an open question. The safe bet for anyone else would be to use metal sheeting instead, as several photos and one drawing shows this - although whether this was zinc, copper or lead sheeting is not clear to me.

After painting, I realized that the individual slats in the roof vents had come out with slightly different angles. So my method for making them could be improved on. The camera is cruel though, and it's not that noticeable in real life.
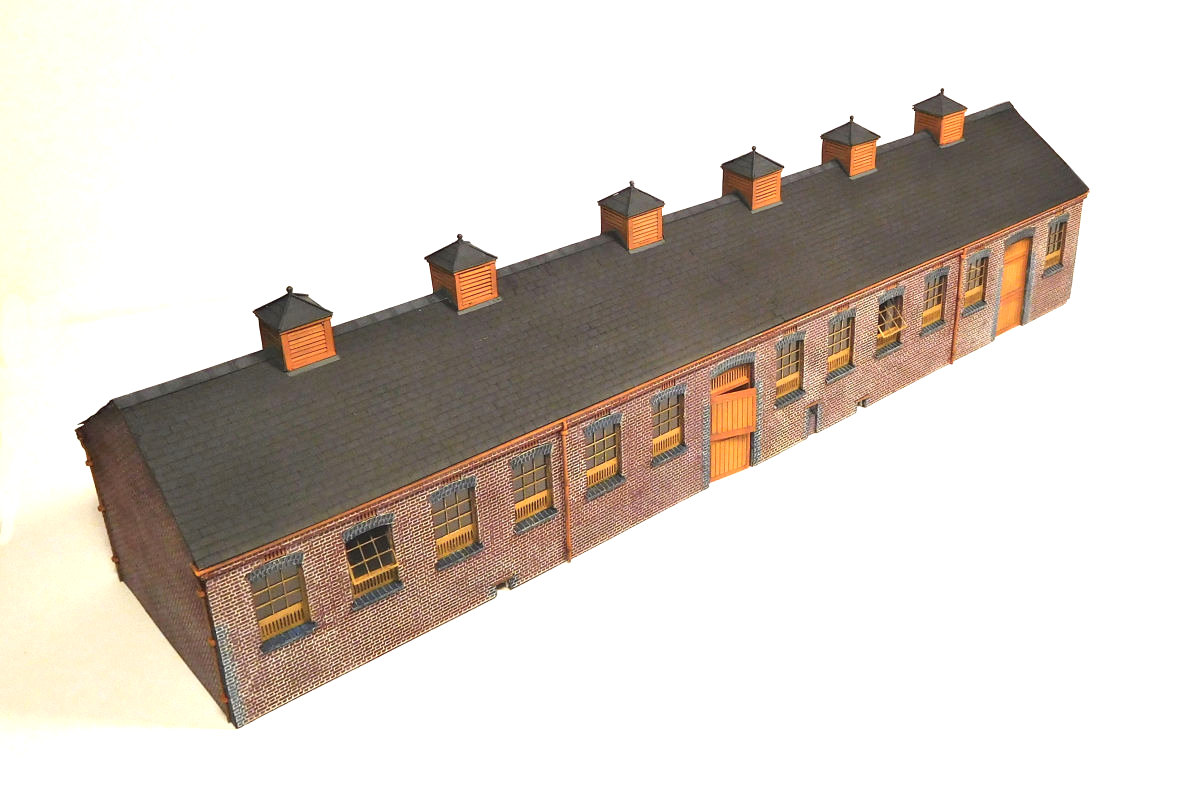
A view from above. The roof vents were not evenly spaced on the prototype.


I have done a bit of light weathering, but it may need more. There is also the question of a manure pit, which I haven't built yet. I first need to make some planning decisions for my current Farthing layout. More on that later.