
I thought it was about time that I finished my Dean Goods, so here it is virtually done.

It's taken an awful long time to do, although in fairness it has been resting untouched for long periods while I worked on other projects.

The loco has the original twin flywheel Oxford mechanism that came with the lined pre-grouping version. Mine is a very smooth runner, which is why I found the project worthwhile in the first place. Indeed I've bought another one at a sale, which also runs very well.
Below is a summary of the main steps since the first post on the project, with some further photos of the completed item towards the end.
Cab


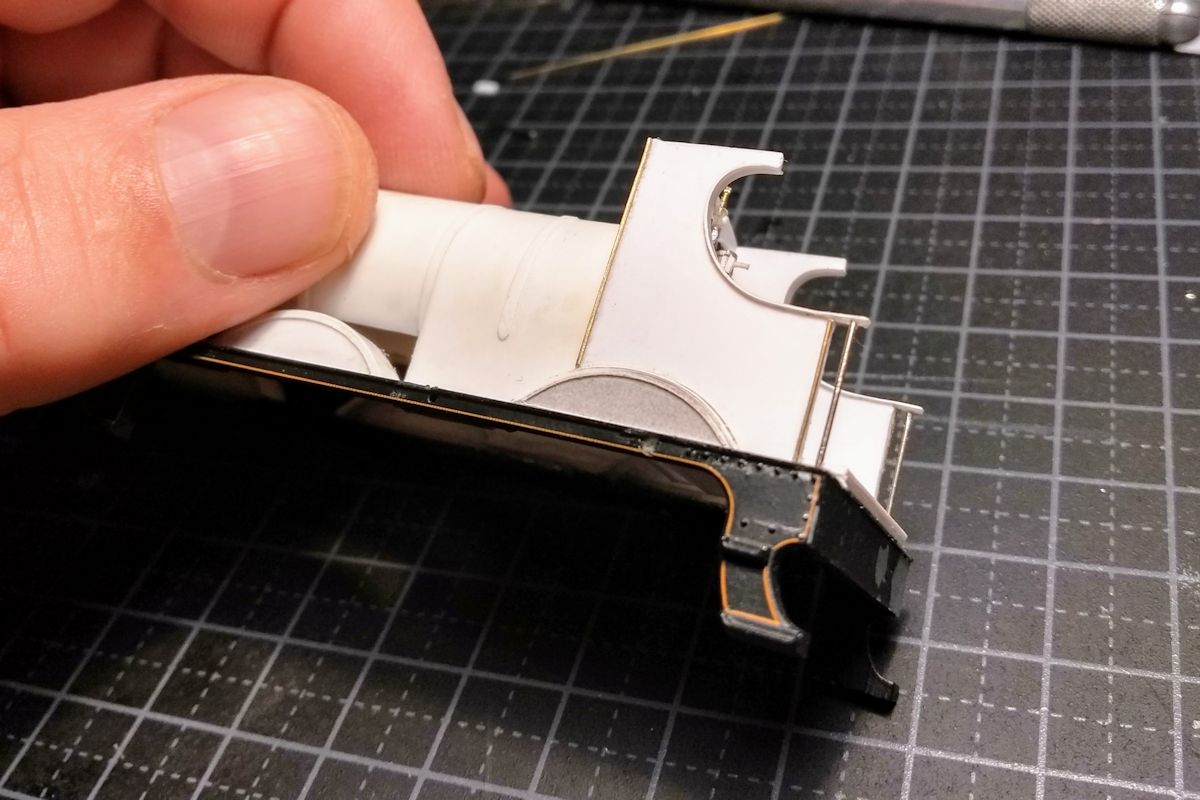
A cut-out was required in order to clear the motor when fitting the body.

The cab detail is a bit quick and dirty. I found a backhead in the spares box, spruced it up a bit and moved it 0.5 mms forward to clear the motor. It’s too low, but don’t tell anyone. The raised floor section in the right hand side of the cab is a feature on 2516 at Steam, but I’m not sure if it was there in the 1900s? According to Martin Finney, cab seats were a later feature so I didn’t fit any.

Brassmasters have some lovely Finney fittings for the cab, but I wanted to save my pennies, so used the Oxford lever and springs.

The cab side beading was made from 5 thou strips, cut on my Portrait and curved gently with my warm and healing fingers. Stuck down with Limonene – my new best friend - and secured by rolling a brush handle against it.
Further beading and handrails were made from wire.

The cab roof was built up with four laminated layers, here are the first two (10 + 5 thou).

And the uppermost two (2 x 5 thou).

The join between cab and boiler was also built up piecemeal, very close to the spectacles as per my prototype.
Fittings

Handrails were fitted using my well established formula: "Measure once, drill thrice !"

Boiler washout plugs from Coast Line Models. Alan appears to have temporarily withdrawn these, I hope they’ll return.

I fashioned a new reversing lever, and fitted a loco jack from the Broad Gauge Society.

Photos of the uprights on which loco jacks were mounted during this period are rare, here's a crop from an image I found (left). Also a standing version, which I suspect was an earlier arrangement.

The curvy “piano lid” cylinder cover was a feature of some locos during the short smokebox period. They were sometimes left in open position while running! Fittings on the smokebox side were cobbled up from bits of brass.

The loco chassis required very little modification, which means it can be easily replaced in case of a major failure. However, an indication of the ash pan and nearby components was needed. So I nicked Larry Goddard’s idea and made a simple screw-on unit.

Later the ashpan was painted and Archer's rivets applied.

The Oxford tender is generally a good representation of the 2500 gallon variant, but various mods were needed to backdate it to 1900s condition. First, the fenders were cut off using a scalpel, and the area was filed clean.

The protecting plates at the rear and front were too high for my 1900s prototype, and were therefore filed down to appropriate height and shape.

I left the casing for the water filler untouched. Subsequent discussions suggest that the shape may have been different during this period - but I will leave it for now.

Next up were the coal rails. I first tried cutting some 10 thou Evergreen on my Cameo. It looks OK here but as might be expected it was just too flimsy.

Instead I used wire from Eileen’s Emporium, halfround as per the prototype. I considered soldering but thought the joints might come undone every time I applied heat, so used epoxy. The result is quite solid.

The uprights were fitted into holes just inside the flare of the tender sides, taking care not to break through the sides. I think the top rail sits a trifle high. Ah well.
Tender
The Oxford tender is generally a good representation of the 2500 gallon variant, but various mods were needed to backdate it to 1900s condition. First, the fenders were cut off using a scalpel, and the area was filed clean.
The protecting plates at the rear and front were too high for my 1900s prototype, and were therefore filed down to appropriate height and shape.
I left the casing for the water filler untouched. Subsequent discussions suggest that the shape may have been different during this period - but I will leave it for now.
Next up were the coal rails. I first tried cutting some 10 thou Evergreen on my Cameo. It looks OK here but as might be expected it was just too flimsy.
Instead I used wire from Eileen’s Emporium, halfround as per the prototype. I considered soldering but thought the joints might come undone every time I applied heat, so used epoxy. The result is quite solid.
The uprights were fitted into holes just inside the flare of the tender sides, taking care not to break through the sides. I think the top rail sits a trifle high. Ah well.

Photos suggest that most of the fittings at the front of the Oxford tender are not appropriate for my period.

Photos suggest that most of the fittings at the front of the Oxford tender are not appropriate for my period. Replacement toolboxes and air vents from Brassmasters (ex-Finney) were fitted. Maybe the latter should be smaller on a 2500G tender, not sure. Sandboxes were cobbled together from bits of styrene.

The front steps of the early 2500g tenders had an inward curve. A couple of round files solved this. The plastic protects the chassis from metal dust.

Here is the result.

The finished tender (less brake gear).

Painting and lining
 The loco in primer.
After recovering from an "orange peel" disaster I got the paint job done. The green is Vallejo 70.850 with a touch of black (5:1), the red is 70.814.

Lining was done with HMRS Pressfix transfers.

One side done. The triple panels on the tender were tricky.

Halfway through I ran out of lining, and discovered that new HMRS lining sheets are a different colour from the older ones. The samples above show the old sheet, and three new sheets. The latter came directly from the HMRS, whose own illustration still shows the older shade. A Fox sheet is also featured. In the end I cobbled together the remaining lining from an old sheet, using 26 pieces for one cabside. It does show in places.
Final details

Cab windows were made by filing and sanding the teeth off watchmaker's cogs.


Not perfect, but I can live with it.

Bit of fun: The Oxford model comes with a choice of coarse or fine screw link couplings (bottom two). I modified mine by adding a “Tommy bar” (top), fashioned from a part that I found in my box of watchmaker’s spares.

A last few shots of the loco. Photos of 2487 and some other Dean Goods shows the safety valve slightly off-set from the center of the boiler band, so I copied that. Annoyingly I forgot to add the safety valve lever. Too late now, I can't get in there to fit it properly.

The big compromise is the seam line in the boiler, although I only notice it from certain angles. I had planned to distract from the join by carrying the lining all round, but experiments showed that it had the opposite effect, so I left it off. Were I to do it again I would give more attention to matching the angles of the two edges as they meet, which could have been better.

Still, I'm happy enough with it. The short smokebox and piano-lid cylinder cover makes it a bit different from available kit versions. No other comparison intended!

So that's about it. Loco lamps and crew are on the workbench, and I need to fit couplings bars between the buffers. I also need some work plates, the one seen here is a stand-in of unknown origin.